Брауэра powered by smf. Автоматическое определение движка форума
Ну что же, начнем давать маленькие советы по оптимизации и продвижении сайтов (форумов) на phpBB. В данном случае мы проведем небольшой хак, который поможет избавиться от внешней ссылки вида "Powered by phpBB © ...". В данной публикации мы рассмотрим 2 способа, с помощью которых можно это сделать - прием для phpBB 3.x.x .
Удаляем внешнюю ссылку Powered by phpBB © 2000, 2002, 2005, 2007 phpBB Group и Русская поддержка phpBB
Первый способ удаления внешней ссылки с надписью Powered by phpBB © 2000, 2002, 2005, 2007 phpBB Group
. И так, самый легкий способ - удалить с помощью панели администратора. Заходим в административную панель, переходим в пункт меню "Стили", слева видим панель, где расположен блок в меню, нас интересует блок "Компоненты стилей", а в нем "Шаблоны". По стандарту в предложенном окне мы увидим следующие: prosilver и subsilver2, хотя моуг быть и другие, если Вы их устанавливали. В общем не суть. Из преложенного набора выбираем используемый по умолчанию. Нажимаем на кнопку "изменить" рядом с шаблоном. Далее появляется окно с предложением "Выбрать файл шаблона". Далее выбираем "Файл шаблона" - "overall_footer.html". Ниже появляется HTML редактор. Находим следующий код: "Powered by phpBB 2000, 2002, 2005, 2007 phpBB Group
" и просто удалем, хотя можно и установить свою ссылку и надпись. "
{TRANSLATION_INFO}
" (который находится ниже, также можно удалить) - это код отвечает за локализацию например внешнюю ссылку с надписью "Русская поддержка phpBB".
Второй способ удаления внешней ссылки с надписью Powered by phpBB © 2000, 2002, 2005, 2007 phpBB Group . Этот способ аналогичен, но мы подключаемся к сайту по пратаколу ftp. Переходим по следующему пути styles/имя_шаблона/template/overall_footer.html. И редактируем тот же код, который редактировали мы выше. Если будете изменять код, то не забудьте установить кодировку UTF - так на месте анкоров могут появится "кракозяблы" (квадратики, и другие непонятные символы).
Туры и отдых в Австралии
Форумы в интернете являются одним из самых популярных видов интернет ресурсов. Это вполне объяснимо, так как форумы - это идеальная площадка для свободного общения посетителей. Форум является прекрасным способом для организации сообщества на вашем сайте и для формирования постоянной аудитории посетителей.
Существует много форумных движков. Давно хотел сделать обзор движков форумов. Сравнивать между собой их не буду - это тема отдельной статьи.
При выборе движка форума советую определить для себя следующие моменты:
1. Какой функционал форума вам нужен. Большинство форумных движков обладают широкими возможностями, но некоторые нюансы реализованы не во всех форумных CMS. Рекомендую посетить официальные сайты движков и ознакомиться в подробных описанием функционала.
2. Платный или бесплатный движок - этот момент тоже необходимо учитывать. В этом обзоре всего два платных движка - vBulletin и IPB, остальные бесплатные.
3. Развитость сообщества - когда у движка есть развитое сообщество как в англоязычном, так и в русскоязычном интернете, это является большим плюсом. Развитость сообщества напрямую связана с числом различных модификаций, доработок и шаблонов дизайна. Если у движка малочисленное сообщество, то нужно иметь в виду, что многие моменты придется решать своими силами.
4. Дата последнего обновления движка - если движок давно не обновляется, это свидетельствует о том, что разработчики его не развивают или забросили дальнейшую разработку. Это является большим минусом. Интернет технологии постоянно развиваются, и форум с устаревшим функционалом будет ограничивать возможности по его дальнейшему развитию.
Ладно, хватит громких слов 🙂 . Начну с самых популярных движков форумов, основываясь на этом рейтинге CMS .
Это мой самый любимый форумный движок, и свой форум Планета Фотошоп я держу именно на этом движке. Причина не только в том, что это бесплатный движок форума, но и в том, что он обладает широким функционалом, имеет развитые сообщества как в англоязычном интернете, так и в рунете, поэтому для phpBB разработано множество модов на любой вкус, с помощью которых можно еще больше расширить функционал.
Логи действий пользователя, модератора, администратора, точные настройки прав доступа модератора и администратора, идентификация поисковых роботов, создание групп пользователей, опросы, вложения в сообщениях и личных сообщениях - вот лишь часть функционала phpBB.
Также мне очень нравится то, в каком направлении развивается phpBB от версии к версии. phpBB удобен как для администратора, так и для модераторов и обычных пользователей.
Мое мнение за несколько лет использования phpBB - это замечательный форумный движок, не требовательный к ресурсам хостинга, и предоставляющий весь необходимый потенциал для ведения форума.
Полезные ресурсы по phpBB:
Invision Power Board - это платный движок форума, который очень популярен на просторах интернета. Стоимость в рунете можно узнать . На нем работают многие известные форумы. Имеет развитые сообщества в англоязычном и русскоязычном интернете.
Для IPB есть дополнительные официальные приложения (модуль галереи, блога, файлового архива). Кроме этого, есть визуальный редактор сообщений, текстовая версия форума, оптимизированная для поисковых роботов, инструмент для удобного бэкапа базы данных форума, подробный журнал действий администраторов и модераторов, а также журнал действий поисковых роботов.
Полезные сайты по Invision Power Board:
🔥 Кстати! Я выпустил платный курс по продвижению англоязычных сайтов. Если интересует, можете подать заявку в ранний список через эту форму , чтобы первыми узнать о выходе курса и получить специальную скидку.vBulletin - замечательный форумный движок. Он платный, стоимость можно узнать . Наряду с IPB, vBulletin является лидером среди платных движков.
Поддержка подкастинга, автоматическая генерация RSS фида форума, возможность создания посетителями социальных групп и клубов по интересам на форуме, галереи фотографий пользователей, поддерживаются теги, возможность добавления тем форума в социальные закладки самими пользователями - вот наиболее интересные возможности vBulletin, на мой взгляд.
punBB - очень легкий и простой форум. Панель управления форумом удобна и интуитивно понятна. punBB имеет меньше возможностей, но это компенсируется быстротой его работы и нетребовательностью к ресурсам хостинга.
Разработчики punBB делают акцент на лёгкость, скорость работы и компактность.
Полезные ресурсы по punBB:
YaBB - бесплатный движок форума, написанный на Perl. В отличие от большинства других форумных движков, YaBB для хранения данных использует не базу данных, а файлы.
Удобный текстовый редактор для написания сообщений, широкие возможности для администраторов и модераторов, возможность менять настройки и шаблоны "на лету", возможность преобразовать страницу в "версию для печати" - вот далеко не все возможности форумного движка YaBB.
Сейчас небольшое отступление. Если вам интересно узнать о тех методах продвижения, которые дают хороший эффект для увеличения целевой посещаемости, то я могу предложить свое платное исследование SEO разведка http://seorazvedka.ru/ , в котором я на примере 10 прибыльных молодых сайтов из разных тематик показал, каким образом они продвигаются и описал, как это можно использовать для продвижения своих ресурсов.
SMF - еще один быстрый и легкий форумный движок. Он нетребователен к ресурсам сервера и активно набирает популярность.
Поддержка OpenID, система предупреждений пользователей, есть возможность при необходимости премодерировать темы, сообщения и вложения, WYSIWYG-редактор для сообщений - и это еще не все, что позволяет SMF!
Intellect Board - оригинальный бесплатный движок. Задумка разработчиков Intellect Board заключается в идее, чтобы создать сайт на основе форума. Функционал Intellect Board очень широкий - сборник статей, презентация, новости, архив файлов, фотогалерея, IRC-чат, энциклопедия. По сути, Intellect Board - это полноценная система управления сайтом.
Основные возможности Intellect Board - Возможность задавать правила для всех разделов, поддержка графических библиотек GD и GD2 для создания уменьшенных копий картинок и фотографий, возможность вынесения предупреждений и поощрений модераторами и администраторами (причем предупреждения могут быть как бессрочными, так и ограниченными по времени), рейтинг тем, статей, файлов и фотографий/
ExBB (Exclusive Bulletin Board )
ExBB - легкий и бесплатный форумный движок. Он также, как и YaBB, не требует базы данных и хранит информацию в текстовых файлах.
ExBB обладает следующими достоинствами: страницы генерируются очень быстро, нагрузка на сервер минимальна, высокая степень устойчивости к взлому, форум работает на файлах, баз данных не требуется, для его работы достаточно, чтобы на хостинге была поддержка php.
Vanilla - оригинальный форумный движок, который интересен своей модульностью. Большой плюс этой форумной CMS - большинство модулей устанавливаются в один клик
Плюсы Vanilla: собственный фреймворк, позволяющий писать расширения, возможность построения сообществ (голосования, облака тегов, блоги, чат, кармоподобные дополнения и т.д.), удобство установки дополнений (в большинстве случаев залил, нажал одну кнопку - и все!), расширяемость стандартного функционала (модульность) за счет дополнений, которых сейчас написано около 450.
Еще одна интересная особенность форумного движка Vanilla - cистема "Шепот" - можно просто отправить кому-либо сообщение шепотом, не покидая страницу темы или создать тему «шепотом», которая будет наглядной историей переписки.
Если кто-то не знает, Simple Machines Forum — для краткости SMF — это, как сказано на официальном сайте, бесплатный, профессионального уровня пакет, который позволит вам организовать ваше собственное онлайн сообщество за несколько минут. на этом движке, вы можете посмотреть здесь. Я сам ставил свой форум по ней (кстати, заходите FreeForum.biz).
Не важно, много или мало спама появляется на вашем форуме. Важно то, что вы тратите своё драгоценное время на модерацию. Настройка плагина, который будет делать за вас всю работу, занимает несколько минут, а сэкономит он вам, в общей сложности, дни и месяцы, которые сложатся из тех минут, которые вы бы тратили на стирание сообщений и удаление пользователей.
Я замечу, что пытался бороться со спамерами своими силами — блокировал доступ по IP и даже по подсетям. Это действительно работало, отсеивало очень много мусора, но, тем не менее, раз в один-два дня кто-то пробивался. И довольно много времени уходило на пополнение базы забаненных IP. Я подумал, что должен быть более удобный способ, и он действительно нашёлся!
1. Установка и настройка Stop Spammer
За две недели работы этот плагин заблокировал 2202 фальшивых пользователей. Каждый из них оставил бы, минимум, по одному сообщению. Спамеры не собираются сбавлять обороты и каждый день я тратил бы время на расчистку своего форума.
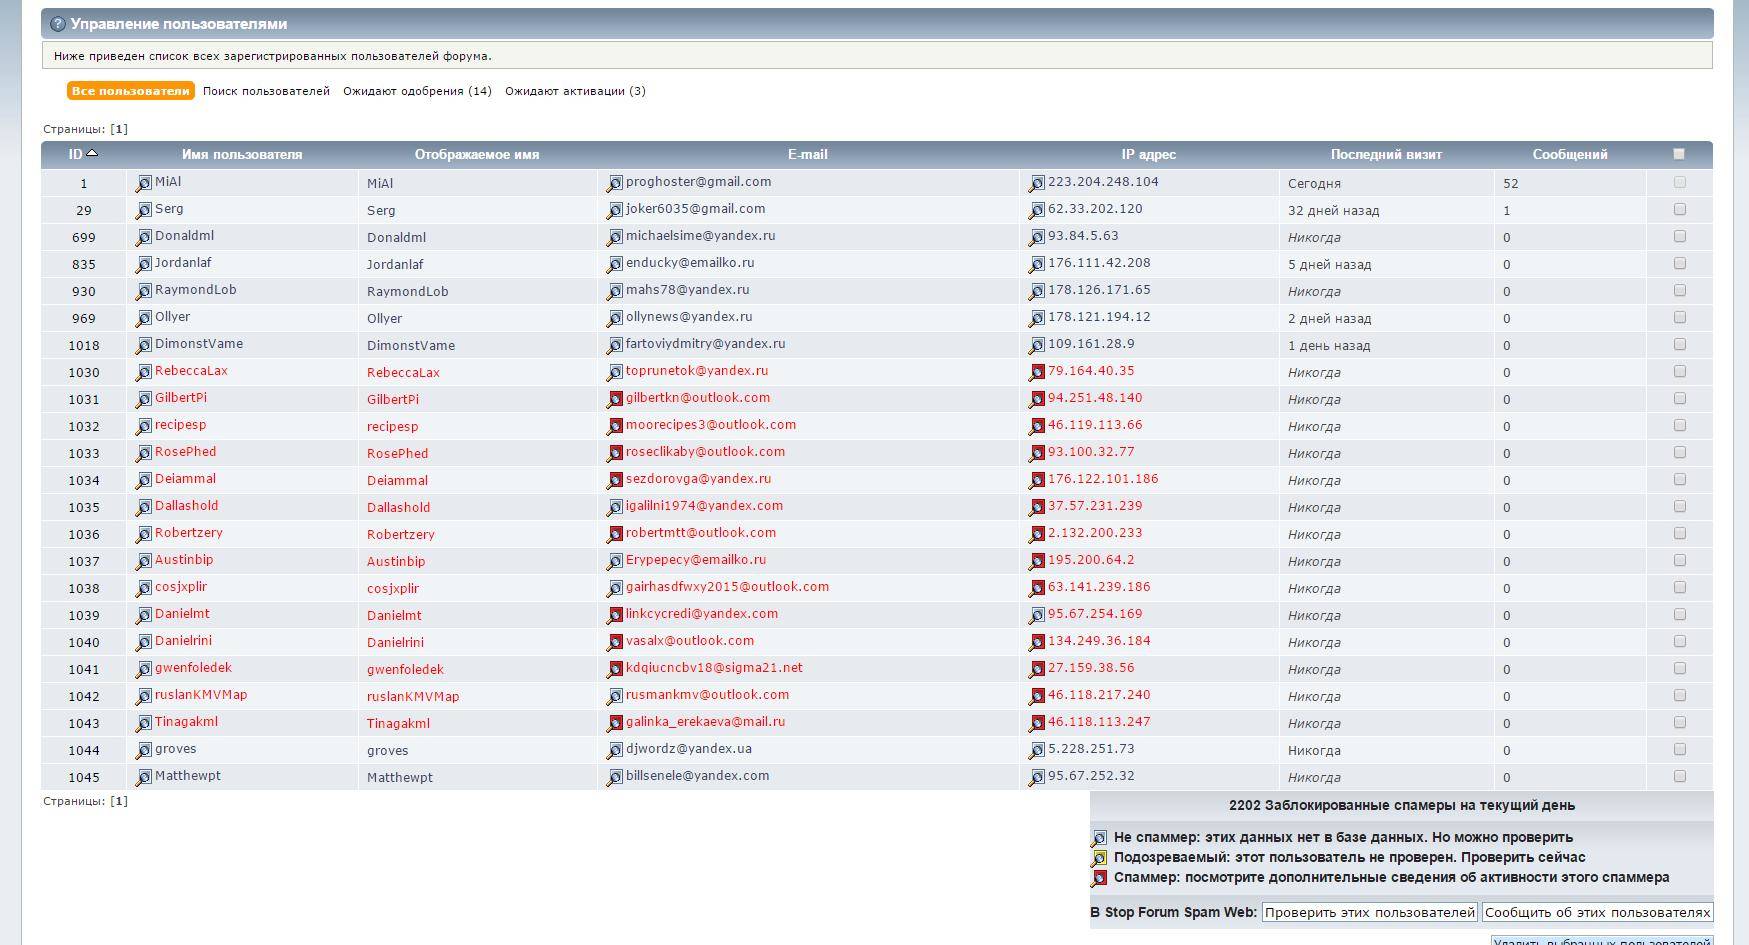
Вместо этого, раз в несколько дней я захожу на страницу управления пользователями, вижу там что-то вроде этого:
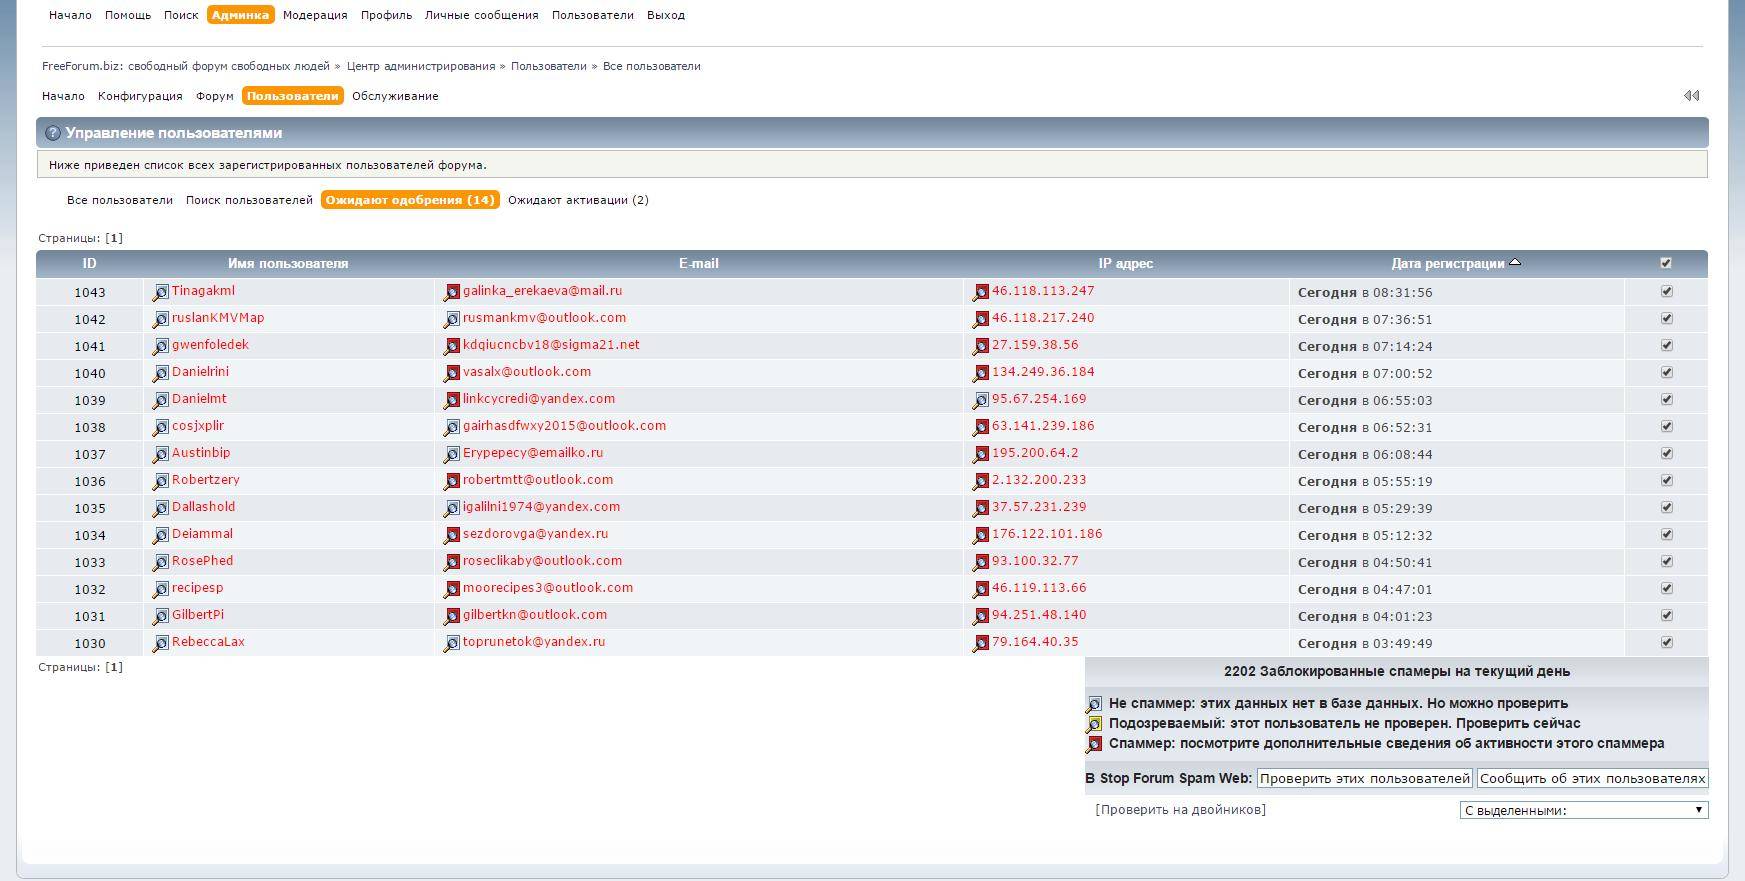
Перехожу к разделу «Ожидают одобрения» (это и есть найденные спамеры, которые лишены возможности оставлять сообщения до одобрения их учётных записей администратором). Ставлю галочку «Выделить всех» и удаляю их одним нажатием:
Вот и всё, все спам-учётки отправляются в небытиё. Возвращаемся к нашему списку пользователей:
Видно, что список заметно поредел, но кто остальные? Выделяем всех и отправляем одной кнопкой на проверку:

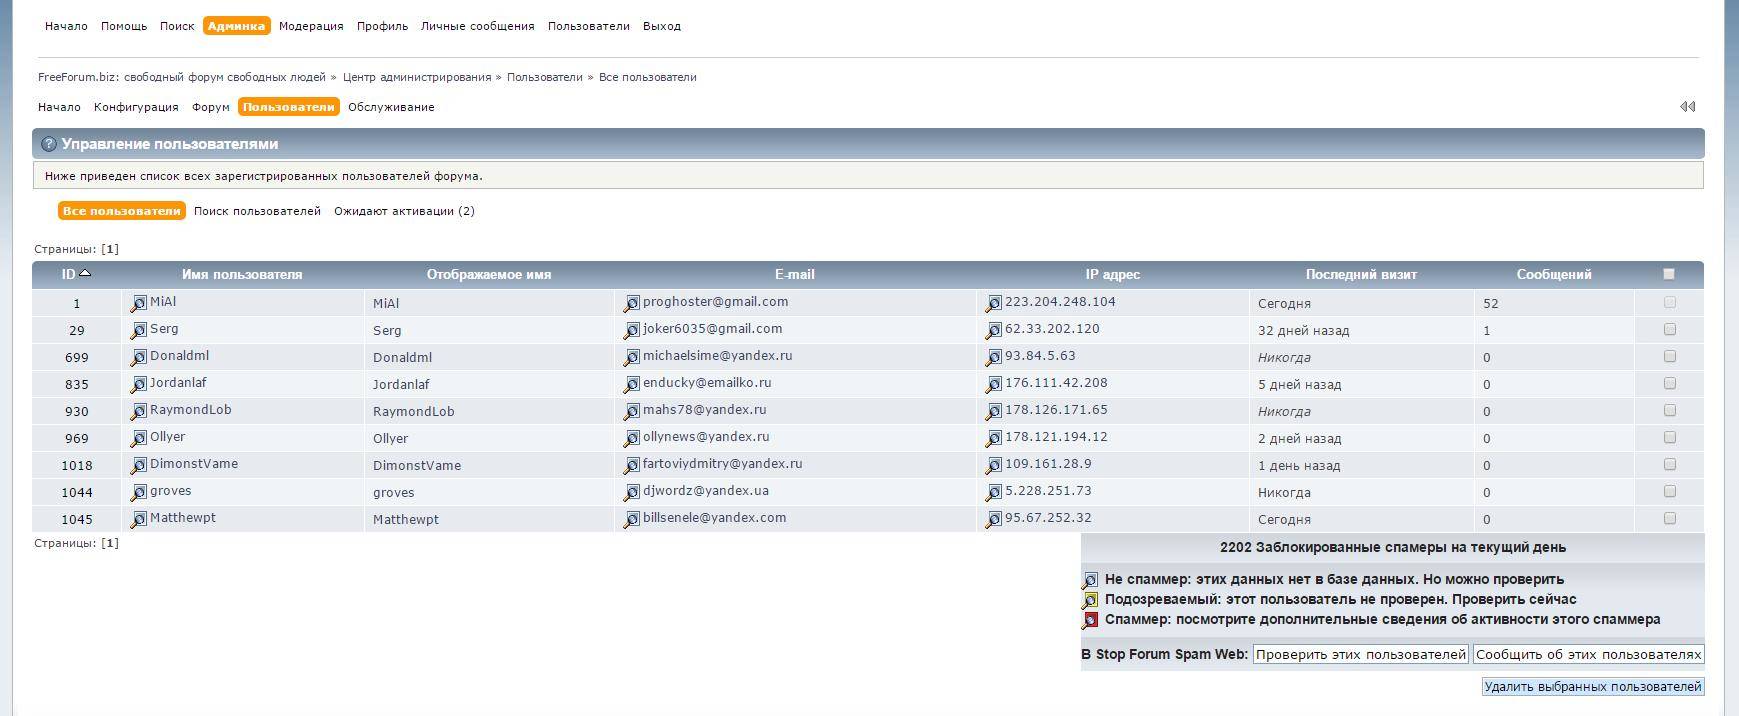
Появился один «красный», его сразу удаляем. Если у вас есть свободное время, можете заняться другими. Если времени нет, то ничего не делайте с новыми пользователями — большинство из них «покраснеют» при последующих проверках. Если же у вас есть время, можете зайти на их профили и посмотреть — если там в подписи прописана ссылка — сразу в бан, это фальшивые учётки спамеров, которые никогда не оставят ни одного полезного сообщения.
Я рассказал как пользоваться этим волшебный плагином, теперь я расскажу как его установить.
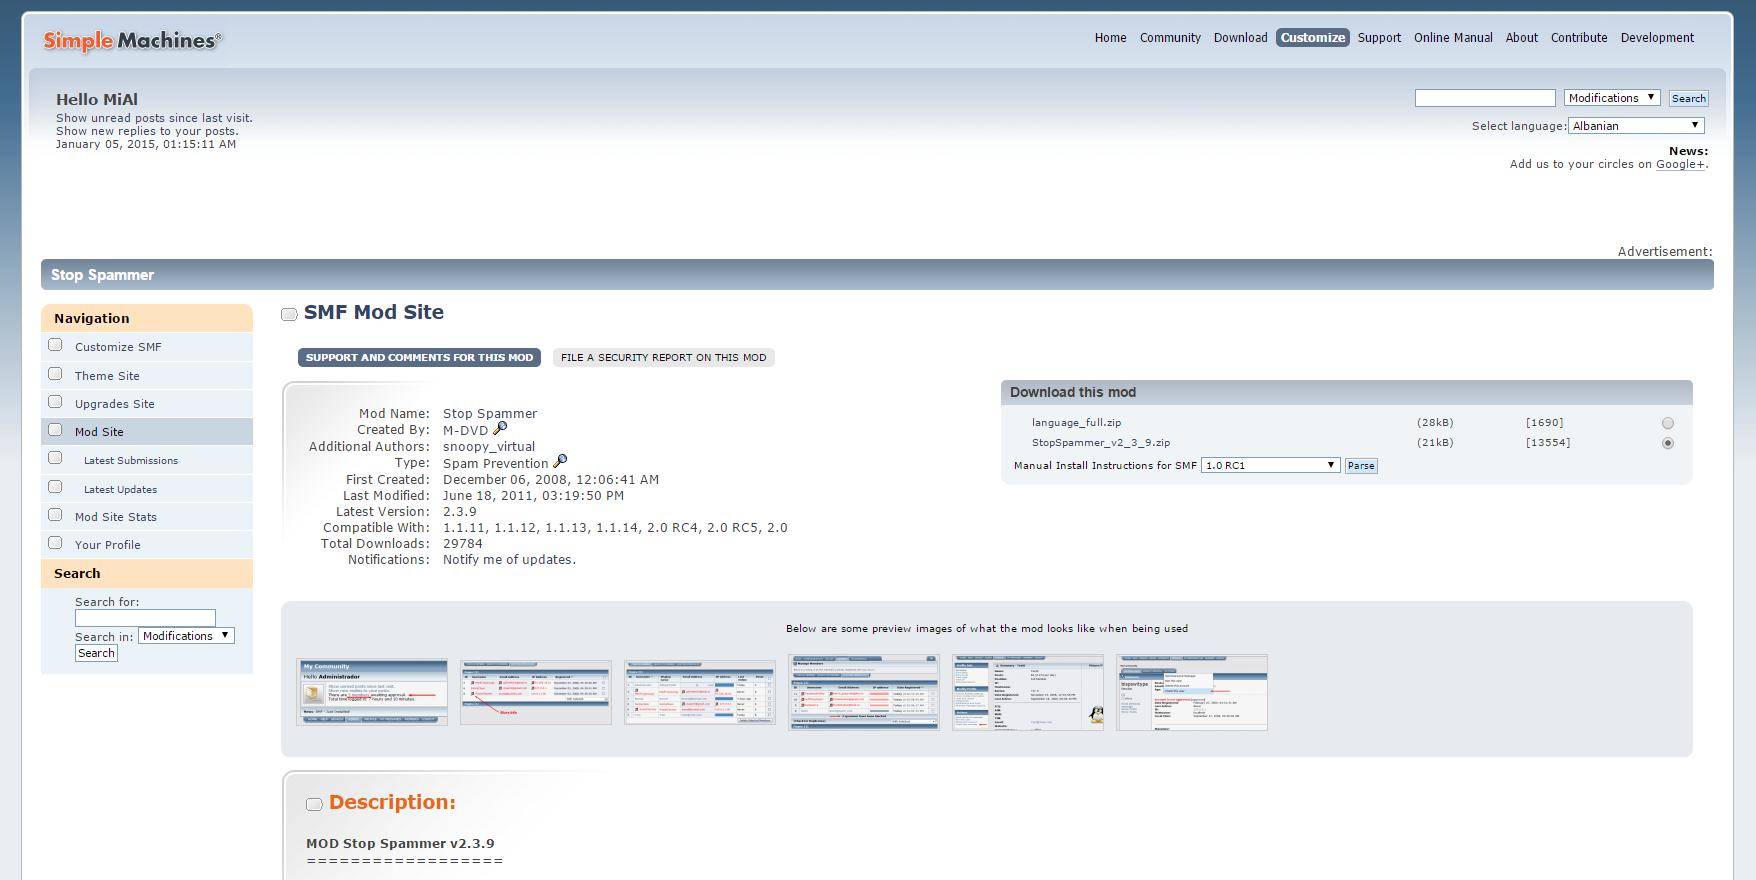
Скачайте два файла: language_full.zip (это языковой пакет для перевода плагина) и StopSpammer_v2_3_9.zip (номер может быть другой, т. к. версии обновляются). Распакуйте содержимое архива StopSpammer_v2_3_9.zip в какую нибудь папку. В эту же папку распакуйте архив language_full.zip, согласитесь на замену файлов. Теперь запакуйте нашу папку в архив zip.
В админке переходите к установке пакетов. Напротив надписи «Загрузить пакет» есть кнопка для выбора файла на компьютере. Выбираете наш новый архив (где мы заменили языковой файл), выгружаете его на форум и активируете пакет.

Вот и всё готово!
Дополнительная настройка плагина происходит в админке: перейдите в
Пользователи → Регистрация → Настройка
Там можете оставить значения по умолчанию. Ещё там есть поле «Ваш API ключ». Без этого ключа вы не сможете сообщать о новых спамерах (но плагин будет работать и фильтровать известных спамеров). Если хотите получить собственный API ключ, зайдите на сайт www.stopforumspam.com для регистрации, а потом укажите ключ здесь. Если вы пока не получили ключ, оставьте поле пустым. Тогда будет использоваться ключ по умолчанию.
2. Установка и настройка Anti-Spam Links
У адептов СЕО-религии (подробнее про моё отношение к СЕО-нистам можете посмотреть в другой ) есть твёрдая убеждённость, что увеличивая количество ссылок на свой сайт, они его «продвигают» (почему-то идея создавать интересный и качественный контент ни к кому из них не приходит в голову). Был бы лох, а способы вытянуть с него деньги найдутся. Так вот, некоторые «граждане» оказывают услуги по «прогонке» сайтов по форумам. Они создают большое количество учётных записей на разных форумах и вставляют туда обратные ссылки в подписях и в других доступных полях. При том, что уже даже «сео-экспериментаторы» опытным путём доказали, толк от этих ссылок нулевой, некоторые предупреждают, что за это можно получить бан от поисковых систем, Яндекс, например, просто игнорирует ссылки на ВСЕХ форумах и сайтах, где любой может оставлять ссылки. У Гугла тоже есть подобные алгоритмы — игнорирование ссылок в комментариях и пр. Но лохам закон не писан… Поэтому нам, владельцам форумов, приходится считаться с теми фактами, что «крутые сео-оптимизаторы» за тысячу рублей заказывают «прогон» своих говноподелок.
Очень много отсеет плагин Stop Spammer. Но мы можем ему помочь! Можно выбить из-под ног спамеров сам интерес размещать ссылки на вашем форуме. Именно для этого и нужен Anti-Spam Links. Этот плагин (конкретные цифры можно менять в настройках) делает так что:
- те у кого, например, менее пяти сообщений, вообще не может оставлять ссылки
- те у кого, например, менее 15 сообщений, не могут оставлять активные ссылки, из ссылок убирается http:// и вообще эти ссылки становятся нуболинками (newbielink)
- те, у кого, например, менее 50 сообщений, могут оставлять активные ссылки, но все ссылки получают атрибут nofollow.
- ну и те, у кого более 50 сообщений, могут вставлять самые обычные активные ссылки, которые передают вес сайта странице, на которую ссылаются.
Поверьте мне, горе-оптимизаторы очень внимательно относятся к тому, в каком виде их ссылка попадает на сайт. Они очень быстро потеряют к вашему форуму интерес, если не смогут с лёгкостью оставлять там свои говно-ссылки на свои говно-сайты.
Да, к стати, приведённые выше правила работают и в таких полях как подписи.
Для установки этого плагина, перейдите на его официальную страницу . Скачайте архив anti_spam_links_v1.0.1.zip (номер может быть другой). Опять в админке форума перейдите к установке пакетов (как это делали с предыдущим пакетом) и установите его. Языкового файла для этого пакета нет, поэтому распаковывать архив или что-то с ним делать не нужно.
Для настройки плагина перейдите в раздел
Конфигурация → Настройка модов… → Настройка модификаций

По своему желанию проставьте, сколько сообщений должен иметь пользователь для апгрейда своих возможностей.
Заключение
Эти два плагина ОЧЕНЬ сильно облегчать вам, владельцу форума, жизнь и сэкономят уйму времени. Тем не менее, время от времени спамеры прорываются и, хотя бы раз в неделю, нужно «прорежать» пользователей и удалять спам-сообщения. Поэтому не забрасывайте свои веб-ресурсы!
Long time no love for seobayers so iam writing this tutorial for you guys:
One of the biggest mysteries about xrumer has been creating profiles and me myself being a noob , but a smart one:P, always try to find ways for creating thins easier. Recently i was doing a test and found a good way of generating profile links easily. Before we start i will post results:
Tools - Hrefer 3.3, Xrumer 7.5, Scrapebox, Adword tool for keyword, Keyword studio pro and a linklist merger
Linklist generated - 250k (unique domains)
Profiles generated - 60k (unique domains) - a lot in just 20 days.Step 1
Generate keywords which people actually try to rank for. This is the most crucial step in profile building. I saw a huge list being shared on another forum which had over 300k words. I say what is the use for searching keywords like "aaaaa", "abra ka dabra" etc. Who will rank for these? So i used common sense and generated keywords which people actually use for ranking.Usage -
1) Note down atleast 100 keywords from google search (not adwords) which are broad and have massive competition like credit card, insurance etc.2) One-by-one load these keywords into keyword studio pro (i used crack version:P) and generate similar keywords. Note that these words are better than scrapebox wonderwheel scraper.
3) Load all these keywords into scrapebox and generate keywords upto 3 levels. De-dup them etc. and save them. Then in the end make a huge list of all the keywords generated from original 100 words.
Step 2
Load them into hrefer but before you begin do this:1) Edit additive words and just use these:
"powered by smf"
"powered by vbulletin"
"powered by phpbb"
"powered by ip.board"Etc. etc. etc. but only forum software names. I did this so i don"t know which are most useful.
2) Edit search engine filter and place this:
Member.php?action=
profile.php?viewprofile=Etc. etc. basically all those filters which have view profile in their url.
The logic is to get maximum of those profiles which have been made for the purpose of visible backlinks. (Iam having trouble loggin into my dedi so will post the complete list later)
3) Start scraping and wait for it to complete.
Step 3 - Another very important step.
Usually you all just load the links in xrumer and blast away but no you should analyze the database also to remove dead ones. So click on tools -> database analysis
1) Type the same "powered by" stuff into the box on left hand side.
2) Choose your linklist and select search content and 50 threads and go. This will remove all 404 forums and blogs etc.
Now we run xrumer with this linklist.
1) Load the database and setup your project.
2) Goto advanced options -> select register only, goto speed<---> success and move all the way to success and select recaptcha with 40-50 atempts.
3) Start and let it complete.
While the posting is done i usually move to next keyword building step.
When all your profiles are created, load them into linklist merger and create a big file from it. Now remove dups and all and you have a good profile link package.
So the jist is - keywords which people search - only few additive words and filters - right settings etc.
You will notice that from your final linklist with medium success and recpatcha off and 20-25 atempts for captcha you will get approx 30k+ profiles. I get 60k with recaptcha and half-success
Happy profile creation....
Starting a New Topic
Browse to the board where you wish to post and click the New Topic button (positioned by default at both the top and the bottom of the board, as shown in the ), which should take you to the Start new topic screen. While this presents a number of options, the two most important are the Subject field and main Message field (not labeled as such, but obvious by its size). So enter your subject and start to type (or paste) your message into the main text area, noting that a message missing either a subject or a body will not be accepted for posting until it has both. If you"re happy with your plain text message, you can then post it by clicking the Post button and/or preview it first by clicking the Preview button, but there are many further available to make things that little bit more interesting.
- Some forums show the navigation tree at the top in a space-saving horizontal mode.
- Some forums may be configured to offer an additional Spell Check button alongside the Post and Preview options.
Starting a New Poll
A poll is basically a topic with an added question and voting options, started by clicking New Poll instead of New Topic . To post a poll it is necessary to fill out the Question field and at least two of the Option fields in addition to the Subject and Message fields required by a standard topic. Further options to configure how many choices the user may vote for, how long the poll should run, whether users can change their votes and what conditions must be fulfilled for the results to be displayed should be self-explanatory.
To offer more than five choices in a poll, simply click Add Option as many times as necessary.
Note that it may also be possible for some users in some forums to add a poll to an existing topic.
Posting an Event to the Calendar
Where this option has been configured (it"s not standard "out of the box"), you can post an event by selecting Calendar from the followed by Post Event from the calendar screen. What you see now is a Start new topic screen with supplementary fields for the event title, date and target board, which simply add your event to the calendar and create a link back to your post in that board.
Replying to a Topic or Poll
Replying to a topic or poll is basically the same as , but it"s not necessary to enter anything in the Subject field unless you wish to change what"s already there. To vote in a poll, you simply have to select your chosen option(s) and click Submit Vote .
If "Quick Reply" has been enabled, a simple reply field will also appear after the post(s) on a page, but you"ll have to type your and manually if you choose to use it.
Quoting a Post
To reply to a post by quoting it, you can either click the Quote button for the relevant post and add your own message to the quoted text or click the Reply button followed by Insert Quote from the relevant post in the "Topic Summary" below, but note that:
- Both these options add a link to the original post showing the name of the poster and the date and time of the post, whereas the quote tag simply quotes the relevant post without this additional information.
- You can also retain or add the "author" attribute independently of the full Quote function, as demonstrated in the below.
Modifying or Deleting a Post
To modify a post, click the Modify button and make your changes. Note that most forums are likely to be configured to show the date and time of the last edit, but the administrator(s) may also allow a short period to elapse before this happens.
To delete a post, click the Delete button followed by OK from the Remove this message? box that appears. Some forums may also allow you to remove topics or polls that you start, but the buttons for these are usually at the bottom of the page.
Standard Posting Options
Notify me of replies
Check this to subscribe to email notification for the topic.
Return to this topic
Check this to return to the topic (instead of the message index) after posting (NB you can also set this behavior as a preference in your profile).
Don"t use smileys
Check this to prevent certain in your post from being parsed and rendered as smileys.
Attachments
If enabled, this feature allows you to attach files to your posts in much the same way as most email clients, so you simply have to browse to the relevant file(s) on your computer before clicking Post . You can delete your attachment(s) or add more by , but please note that:
- The permitted file types and sizes are set by the forum administrator(s).
- Although most forums are likely be configured to display attached images as part of the post, it"s not possible to preview attachments so you should always browse to and attach your files just before you finally post your message.
References
SMF Bulletin Board Code
The buttons shown belong to the SMF default theme and may differ from forum to forum.
Tag Name Button Code Output Comments Bold [b]bold bold * * * * Glow glow The three attributes (eg red, 2, 50) in the "glow" tag are color, strength and width respectively. The two attributes (eg red, left) in the "shadow" tag are color and direction respectively. move move Not valid XHTML, but can also be used for images! Simple
Machines
ForumSimple Machines Forum Preserves critical text formatting, rendered in a monospace font. left align * centered * right align * Right-to-Left * right to left! Typical usage would be to post Arabic or Hebrew in an English document. Left-to-Right * left to right! Typical usage would be to post English in an Arabic or Hebrew document. * font size * font face Only fonts installed on the user"s computer will be displayed, so use with caution! Font Color Change Color Black Red Yellow Pink Green Orange Purple Blue Beige Brown Teal Navy Maroon Lime Green red red Select the color from the drop-down.
http://somesite/somefile.swf
http://somesite/somefile.swf Please note that, if embedded Flash has been disabled by the forum administrator(s), the Flash file will appear as a straight hyperlink as shown here. The two attributes in the "flash" tag (where relevant) are width and height respectively.
http://somesite/image.gif
Type the width and height attributes to resize the image.
http://somesite/image.gif
http://somesite/ http://somesite/ NB the "url" tag opens in a new window, but you can type "iurl" tags to open in the same window.
descriptive link
descriptive link
someone@somesite
someone@somesite *
ftp://somesite/somefile
ftp://somesite/somefile *
descriptive link
descriptive link * No meaningful output from the "table" tags alone. * No meaningful output from the "table" and "tr" tags alone.
content
content Note the correct nesting of the tags, so the "table" tags contain the "tr" tags, which each contain an equal number of "td" tags! SMF
Bulletin
Board
Code
SMF Bulletin Board Code superscript * subscript * teletype Monospace font.